
Everyone love cookies, especially when they're soft, chewy and full of chocolate. With so many people following a vegan and dairy free diet at the moment I had a go at testing my very own recipe and baking some of everyone's favourite cookie, the chocolate chip. This recipe is super simple and it takes no time at all to whip up a batch, so it's really handy to have if you have people coming over. I really hope you enjoy baking these and sharing with friends and family. P.S Don't forget to serve with the traditional glass of milk (almond or soy of course). I also have another exciting cookie recipe coming up which has been inspired by everyone's favourite mythical creature... any guesses what it could be?

To make the vegan chocolate chip cookies you'll need:
100g vegan butter/spread
100g caster sugar
1/2 teaspoon vanilla extract
1/2 teaspoon vegetable oil
150g self -raising flour
75g dark (vegan) chocolate cut up into small shards or you can use chocolate drops.
How to bake these delicious vegan chocolate chip cookies:
How to bake these delicious vegan chocolate chip cookies:
- Pre-heat the oven to 190c or Gas mark 5 and line your baking tray with grease proof paper.
- Measure the butter and sugar into a medium sized mixing bowl and beat until creamy. Add the vanilla extract and the vegetable oil until mixed well.
- Mix in the flour and add in the chocolate, if you're finding it hard to mix, use your hands to make the dough come together. Then pop the bowl into the fridge for 15 minutes.
- Spoon big teaspoons of the mixture onto your baking tray. This recipe should make around 8-9 big cookies or 20 smaller ones.
- Then put them into the oven for 15 minutes or until golden brown.
- Once out of the oven leave the cookies to cool on the tray for 10 minutes.
- These cookies should last for up to a week in an airtight tin but I doubt they'll last that long!


6 comments
Easter is nearly here! Not only does that mean that a four day weekend is coming up, but it also means that you're allowed to eat chocolate for the whole time! So, I decided to make possibly the most flamboyant cupcakes ever made, as a fun Easter treat. I recently bought a bunch of baking goodies as I thought my little baking cupboard was lacking some more exciting decorations. I searched online for some new pieces and came across some super bright food colouring, edible liquid copper paint (which I used to paint the mini eggs) and edible holographic glitter, a few weeks later, these cakes were created.


To make the Easter cupcakes you'll need:
175g butter, cut into large pieces
175g self-raising flour
175g caster sugar
½ tsp baking powder
3 large eggs
½ tsp vanilla extract
A drop or two of pink and purple food colouring, I use Wilton
Decorations; I used mini eggs, edible food paint and edible glitter
For the chocolate buttercream you'll need:
85g butter
175g icing sugar
2 tablespoons cocoa powder
1 tablespoon milk
- For this recipe I'm going to be using Mary Berry's Vanilla cupcake one, as it never goes wrong and sometimes I day dream and pretend I'm her... So, preheat the oven to 180 degrees or gas mark 4, and line a regular 12 hole tin with baking paper cases.
- Put all the cake ingredients into a large bowl and beat with an electric hand whisk or a wooden spoon until smooth and evenly mixed, add in your pink food colouring. Save an eighth of the mixture and add a dash of purple food colouring. Don't worry if you've already made the whole mixture pink, the purple will still blend in easily.
- Divide the mixture evenly between the paper cases. Once you've added in all of your pink cake batter add a teaspoon of the purple mixture and swirl in the cake case with a knife or skewer for a more professional effect.
- Bake for 20 minutes, or until the cakes are well risen and firm on top. Transfer to a wire rack to cool.
- Whilst the cakes are cooling it's time to make your chocolate buttercream. Mix butter and icing sugar until smooth. Add in cocoa powder, if you find that it's not coming together nicely, add in a drop of milk and mix again until smooth.
- Once your cakes have completely cooled add your buttercream to the top of your cake. You can use a piping bag, palette knife or a regular kitchen knife (which is what I used) to create your frosting design. My Cupcake Addiction has some amazing videos on her channel if you're looking for some frosting inspiration.
- It's time to decorate! I painted my mini eggs with copper food paint and popped them on top in groups of three, to finish I then sprinkled some edible holographic glitter to make them extra sparkly!

I'm rather excited about this weeks blog post as it contains Christmas cupcakes! I feel like in the last week the blogging world has gone a little gift guide crazy so hopefully this post breaks them up! Now these aren't just any cupcakes, these are chocolate flavour with bows on the top, so they look just like a little Christmas present. I think these would be the perfect thing to bring to a Christmas dinner as a special treat for afters, and I'm sure all of your friends and family would be pretty impressed if you brought these out. Now, I have a little confession, I didn't make these as I cannot make a cupcake as pretty as this, I collaborated with my friend and self taught baker Bryony who has the most wonderful baking Instagram (which you can check out here!) I wanted to have truly amazing Christmas recipe to share with you and I'm just so happy with how they turned out! It's only 25 sleeps until the big day so you have plenty of time to practice!


For the cakes:
200g plain flour
40g cocoa powder
280g caster sugar
3 tsp baking powder
Pinch salt 80g
unsalted butter (room temp)
240ml whole milk
2 eggs
1/2 teaspoon vanilla extract
For the icing:
130g unsalted butter
400g sifted icing sugar
50g sifted cocoa powder
50ml whole milk
Equipment:
12 cupcake cases
A Muffin tin
Red gel food colouring/paste (I use Wilton's)
White fondant icing
Piping bag
Round piping nozzle
Preheat oven to 170 degrees Celsius/ gas mark 3.
How to make your Christmas cupcakes:
Put flour, cocoa, sugar baking powder, salt, butter in a mixing bowl. Mix together with an electric mixer until sand-like in texture. In a jug, whisk the egg, vanilla and milk until combined. Pour half of the liquid mixture into the dry mix. Whisk on a high speed until combined. Put your mixer onto a slower speed and pour in the remaining liquid. Mix on a low speed until completely combined.
Put flour, cocoa, sugar baking powder, salt, butter in a mixing bowl. Mix together with an electric mixer until sand-like in texture. In a jug, whisk the egg, vanilla and milk until combined. Pour half of the liquid mixture into the dry mix. Whisk on a high speed until combined. Put your mixer onto a slower speed and pour in the remaining liquid. Mix on a low speed until completely combined.
Spoon the mixture into the twelve cases about 3/4 full. Now pop in the oven on the middle shelf for 20-25 minutes. Remove the cupcakes from the oven. You can check they are perfect by using a cocktail stick - it should come out clean.
While the cupcakes are cooling, make the butter cream. To do this, first beat the butter with your mixer in a bowl for around 5 minutes. You want a light and super smooth texture! Then add the icing sugar and cocoa powder, roughly one third at a time, mixing well each time and ensuring the sides of the bowl are scraped as you go. Add a drop of the milk on each mix to get a light and fluffy consistency. Now add a generous teaspoon of red food colouring - you're looking for a deep red so keep on adding food colouring until you achieve the colour you're after.
When you're happy with your icing, spoon it into your piping bag that has your round nozzle in (top tip: use a pint glass to hold your piping bag while you fill it, folding the sides over the rim of the glass). Snip off the end of the piping bag. Pipe directly onto the cupcakes, starting on the outer edge of the cupcake working your way in, using a smooth, continuous circular motion.
Once all the cupcakes are iced, it's time to make your fondant bows. Roll your fondant out on a surface lightly dusted with icing sugar, until around half a centimetre thick. Trim the edges of the fondant to make a rectangle, Then cut into 1cm width strips. Use these strips to create the cross on top of the cupcakes, trimming the edges once in position on top of the cupcake. Now repeat steps above to make another identical fondant rectangle. This time cut the fondant to 2cm by 8cm strips. Lay the fondant with the longer edge facing you. Take the left hand of the strip and fold into the middle. Repeat with the right hand side so the two edges meet in the centre. Now pinch the centre and use a small strip of fondant, to lay over the join and pinch behind the bow to seal. If the fondant isn't sealing together, use some water on your fingertip to seal. Place the bow in the centre of the cupcake.


As a fashion and lifestyle blogger I try to make sure I post what I would like to see, and that's variety. I used to post recipes all the time, but as the fashion side of my blog grew the recipes seemed to disappear. However they're back, and if you've not been able to guess already I've got a pretty special rocky road recipe to share with you, what's even better - it's veggie friendly. In this recipe I popped a load of the smooth caramel and Belgium chocolate popcorn from Joe and Seph's* on top and I think it added a really amazing crunch to it. I substituted the marshmallows with a Mars bar which creates a nice softness in the rocky road and it means that no little piggies were hurt in the making of these. A bit of a bonus for all of you vegetarian rocky road lovers out there! I was kindly sent a few of the popcorn pouches from the brand and I've included my favourite flavours in the photo below (one of which was the inspiration behind the post)! I loved the cheese and paprika, vanilla cheesecakes and the smooth caramel and Belguim chocolate flavours. I'm still yet to try their legendary gin and tonic flavour, I think it would be a great thing to serve at a summer picnic or BBQ.
For this recipe you will need:
500g of milk & dark chocolate
1/3 cup of raisins
10 glacé cherries
2 chopped up Mars bars or marshmallows
10-15 digestives
70g of Joe & Seph's popcorn or any toffee popcorn
Hundreds and thousands (to sprinkle on top)
500g of milk & dark chocolate
1/3 cup of raisins
10 glacé cherries
2 chopped up Mars bars or marshmallows
10-15 digestives
70g of Joe & Seph's popcorn or any toffee popcorn
Hundreds and thousands (to sprinkle on top)
Other options you could pop in are; Maltesers, Snickers, nuts, cranberries or even coconut flakes.
How to make:
- Line a medium sized square baking tray with cling film. I didn't have one of these so I just used a pie dish. Feel free to use anything you like, just make sure it's not too big and that it's deep enough.
- Break up your biscuits into chunks. You don't need to be careful with this I just snapped the biscuit in half a few times and found this size worked well!
- Create a bain-marie and melt the chocolate slowly on a low temperature, or simply pop in the microwave for a few seconds a time. Make sure you stir your chocolate each time to ensure it's melting evenly.
- Take your biscuits, mars bars, fruit and any other tasty treats you are using and and combine with the chocolate mixture. Stir well to ensure everything is completely covered. You will need to keep a little bit of the melted chocolate to one side to drizzle on top.
- Tip the mixture into the lined dish, and spread the mixture out into the corners. Lightly press your popcorn pieces on top, drizzle on the remaining chocolate with a spoon and finally scatter over your hundreds and thousands.
- Refrigerate for at least 2 hours then cut into fingers or squares, serve and most importantly enjoy!


*This post was created in collaboration with Joe & Seph's

Before I start this recipe post and take any credit for it, I am going to say that I stole the recipe from Vivianna Does make up and made a few tweaks! So for my version of this recipe you will need:
200g unsalted butter,
300g caster sugar,
1 large egg,
275g self-raising flour,
75g cocoa powder,
One big bar of milk chocolate (around 100g-150g)
2 tubes of smarties
and some milk.
300g caster sugar,
1 large egg,
275g self-raising flour,
75g cocoa powder,
One big bar of milk chocolate (around 100g-150g)
2 tubes of smarties
and some milk.
Pre-heat your oven to 200°C. Cube your butter and pop into the microwave if it isn't soft already and mix in with your sugar until you have a creamy consistency Once your happy with your mixture, crack the egg and continue mixing. Once you have a smooth pale yellow mixture add in your cocoa powder and your flour. I found that my mixture wasn't mixing too well so I added milk until I had a thick but manageable mixture.


I added my broken up chocolate and smarties to the mixture, and then lined my two trays with grease proof paper or baking paper. This mixture should make around 12-14 cookies, so take a hand full of the mixture roughly make into a ball shape and flatten and place on the baking tray and bake for around 10 minutes. When you take them out of the oven they will be slightly runny so be careful! Then for the difficult part, leave to cool for around 20-30 minutes as they will stiffen up and enjoy (they're perfect when they're warm.) My tip is if they've lasted in your house longer than an hour, pop them in a microwave for a few seconds and the cookie will be nice and warm again!
I haven't done a recipe post in a very long time so I thought I should post one to help us get through these January blues! I know many of us are trying to loose a bit of weight or become a bit healthier, but we all need a treat now and again!
For this recipe you will need:
- 175g of Dark Chocolate
- 175g Butter
- 2 ripe Bananas
- 2 eggs
- 120g Self raising flour
- 120g Caster sugar
1. Preheat the oven to 175°C
2. Break the chocolate into a plastic bowl & add your butter (cubed)

3.Melt your butter and chocolate in the microwave on a medium setting. Be careful to not let it overheat, so keep an eye on it (it should look like something in the picture below).

4. Peel and mash your bananas into a mixing bowl and then beat in your 2 eggs.
5. Add your flour, then the sugar into the banana and egg mixture.

6. Combine the chocolate and batter mixture into the mixing bowl.

7. Add into your baking tray/dish and bake for around 25/30 minutes.

8. Let your brownie's cool for around 15 minutes, then cut and enjoy!
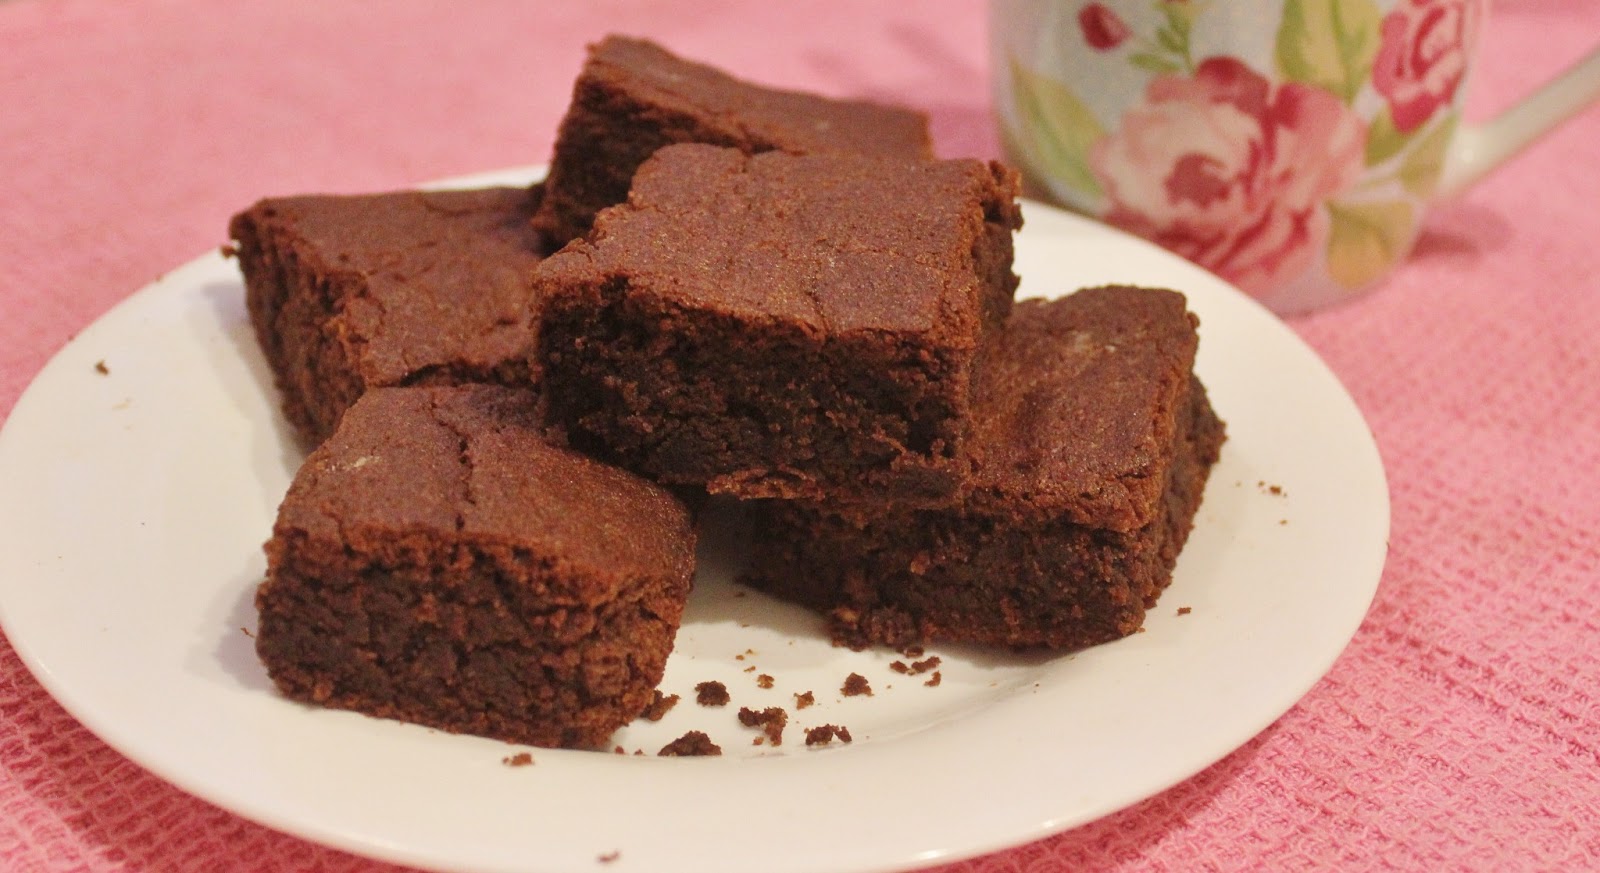
It really is as simple as that! I had so much fun making these brownies and they tasted amazing! I'd love to know if you have a go making these, let me know what you think in the comments below! I adapted this recipe from the Sorted cookbook, which is a fantastic book and I couldn't recommend their website and YouTube channel enough!

1. I squealed a bit when i saw one of my favourite YouTube'rs had retweeted one of my photos, 2. & 3. A night out with some of my flatmates, 4. Me and my boyfriend had a night in and treated ourselves to two for Tuesdays 5. Rekorderlig, 6. Baking on my day off, 7. Tickets to see Looper, 8. I had another Domino's with my flat mate (this is not going to become a weekly thing I promise!) and 9. An afterwork treat.

1. Trying to be healthy, 2. My friend brought these cupcakes back with her from her sister's baby shower, they're so cute! 3. Cat onesie from Primark, 4. The massive Tesco delivery, 5. Gossip Girl is back! 6. Halloween treat's I brought for my family, 7. OOTD, 8.Cocktails are Bar 55, and 9. Seeing my favourite band in London, Lower than Atlantis.
Subscribe to:
Posts (Atom)